
TL;DR
I moved three WordPress sites onto free Cloudflare hosting and now I update them from Cursor.
That is what I ended up with. My old WordPress sites became static sites. I manage them in Cursor with prompts. Cloudflare hosts them for free. There is no WordPress left.
This is how I did it for truevis.com, revthat.com, and aifab.xyz.
Why leave WordPress
I wanted the content I already had, without the machinery that was serving it.
I also did not need WordPress. A consulting site and a technical blog do not need user accounts, comment threads, roles, or a public login. Those features were still there, which meant an admin panel on the internet, a database of users, and a comment system I was not using. The CMS was solving problems I did not have.
What I did have was a site that was constantly plagued by bugs, errors, and possible hacking. Some days I could not even get into the admin panels easily. That is a bad place to be when the only way to change a heading is through wp-admin.
Maintaining WordPress was a burden of its own. Core updates, theme updates, and a pile of plugins, each with its own update cycle and breakage. There are other plugins that try to manage that for you. I still ended up babysitting the stack.
One of those plugins was Wordfence. It would occasionally remind me how many hundreds of hackers had tried to gain access to the admin of the sites. That is the cost of leaving wp-login.php on a public domain: you get a security product whose job is to tell you the internet is knocking on the door. A static site has no admin panel to knock on.
WordPress is a CMS. For these sites, that was more than I needed:
- A database for pages that almost never change
- A theme stack (Astra, Elementor, and friends) on every request
- Users, comments, and login pages I was not using
- Plugin updates constantly available
- Hosting that I was paying for so that wordPress could keep running
The pages themselves were fine. The delivery system was the problem.
Step 1. Rip the live site with HTTrack
HTTrack Website Copier is an old, unglamorous tool that does one thing well: it crawls a website and writes it to disk as HTML, images, and other files, with the folder structure matching the URLs.
I pointed it at each live WordPress domain and let it download. On Windows it lands under something like C:\My Web Sites\<sitename>\. Each WordPress permalink becomes a folder with an index.html inside it. /contact/ becomes contact/index.html. That mapping is the whole trick.
A few settings that mattered:
- Stay on the same domain. Do not follow every outbound link into the rest of the internet.
- Get the HTML, images, CSS, and downloads you actually use. You will throw most of the CSS away later, but you need the images and the copy.
- Accept that WordPress will also dump junk:
wp-admin,wp-json, feeds,?p=query clones, author archives, tag clouds, cookie bars, related-posts widgets. Leave them in the rip. Do not import them into the new site.
I treated the rip as a snapshot, not as the new site. The HTML is full of theme chrome. The useful part is the article body, the titles, the meta descriptions, and the image files.
If the host ever died, I still had a complete local copy. That alone is worth doing before you cancel anything.
Step 2. Rebuild with Cursor as npm site
I did not hand-convert hundreds of HTML files. I opened Cursor on a new repo, pointed the agent at the HTTrack folder, and told it to generate a real npm project from that rip.
The sites it produced are Astro projects: static output, Tailwind for layout, npm run dev locally, npm run build for production. They are ordinary Node packages. package.json, src/, public/, a dist/ folder after build. Nothing WordPress-shaped.
The prompt, boiled down:
- Walk the rip. Every clean slug directory with
index.htmlis a candidate page. - Keep the URLs. Trailing slashes, same as WordPress, so old links and search results still work.
- Pull title and meta description out of the page head (Yoast left those in the HTML).
- Extract the visible article or page copy. Throw away headers, footers, cookie banners, comment forms, share buttons, and sidebar widgets.
- Copy only the images the pages actually use into
public/images/. Do not vendor the wholewp-contenttree.
What I told it to skip:
wp-json/,wp-admin/,xmlrpc, feeds- Query-string duplicates HTTrack saves as
index7a80.htmland similar - Author, date, and tag archive shells
- Theme and plugin assets: jQuery, Elementor, Astra, Contact Form 7, DataTables
For the brochure sites (truevis, aifab), that became one Astro page per route. For the blog (revthat), posts became Markdown in a content collection, with the original slugs. The Dynamo Nodes catalog on truevis was a WordPress-era feature I did not want back, so it stayed gone.
Cursor is not a one-shot compile. You go back and forth: broken images, leftover plugin markup, lists that lost their bullets, a contact form that used to be Contact Form 7 and is now a mailto: and a WhatsApp link. The rip is the source of truth for what existed. The new repo is the source of truth for what ships.
Locally you work like any other npm app:
npm install
npm run dev
When a page looks right, you build:
npm run buildThat writes static files into dist/. HTML, hashed CSS and JS, images. No PHP. No database. A folder of files a CDN can serve.
Step 3. Host for free on Cloudflare
I put each site in its own GitHub repo and connected it to Cloudflare Workers. Cloudflare can serve a static dist/ folder as Worker assets. On the free plan that is enough for sites like these.
The setup, once per site:
- Push the repo to GitHub.
- In Cloudflare, create a Worker and connect that GitHub repo (Workers Builds).
- Build command:
npm run build. Output directory:dist. - Attach the custom domain (
truevis.com,revthat.com,aifab.xyz). Cloudflare issues HTTPS.
A small wrangler.jsonc in the repo tells Wrangler where the files are, for example:
{
  "name": "web-revthat",
  "compatibility_date": "2026-08-30",
  "assets": {
    "directory": "./dist",
    "not_found_handling": "404-page"
  },
  "routes": [
    { "pattern": "revthat.com", "custom_domain": true }
  ]
}
You can also wrangler deploy from your machine. I do not, day to day. The Source Control sidebar is the deploy button.
Point DNS at Cloudflare (nameservers at the registrar, or the domain already on Cloudflare). Preview on the *.workers.dev URL first. When that looks right, attach the real domain and cut over. Mail is separate: if the domain also receives email, copy MX records before you switch nameservers, or you will break mail. The website move does not require PHP on the old host at all.
After cutover you can cancel the WordPress host. There is nothing left for it to do.
Step 4. Install Cloudflare tools in Cursor
Commit from the sidebar is enough to publish. The dashboard is still there if a build fails, DNS is wrong, or you want to see what Workers exist. I did not want that to be a second admin panel.
Cloudflare ships a Cursor plugin that gives the agent two extra layers: skills (how Wrangler, Workers, and the rest of the platform actually work) and MCP servers (live tools that call Cloudflare: docs, the API, Workers Builds, bindings, observability). Official write-up: Cursor + Cloudflare.
Install it from the Cursor Marketplace, or in Cursor chat:
/add-plugin cloudflareYou can also add the skills as a remote rule: Settings → Rules → Add Rule → Remote Rule (GitHub) with cloudflare/skills.
The first time the agent uses a Cloudflare tool, Cursor opens a browser OAuth screen. Sign in, pick the account, grant permissions. After that, a prompt can do the dashboard jobs: list Workers, read a failed Workers Build, pull current docs instead of guessing from old training data, create a binding, look at logs.
If you prefer not to use the plugin, add the same MCP servers yourself. In Cursor that is Settings → MCP, or a mcp.json file. User-level config lives at ~/.cursor/mcp.json (on Windows, %USERPROFILE%\.cursor\mcp.json). Project-level is .cursor/mcp.json in the repo.
The servers I actually use for these sites:
{
  "mcpServers": {
    "cloudflare-api": {
      "url": "https://mcp.cloudflare.com/mcp"
    },
    "cloudflare-docs": {
      "url": "https://docs.mcp.cloudflare.com/mcp"
    },
    "cloudflare-bindings": {
      "url": "https://bindings.mcp.cloudflare.com/mcp"
    },
    "cloudflare-builds": {
      "url": "https://builds.mcp.cloudflare.com/mcp"
    },
    "cloudflare-observability": {
      "url": "https://observability.mcp.cloudflare.com/mcp"
    }
  }
}
Workers Builds is the one that matters when a commit produces a red build. There is a longer catalog in Cloudflare’s MCP servers for Cloudflare docs. You do not need all of them.
Three pieces, same job:
- Skills — the agent already knows Wrangler flags,
wrangler.jsonc, and Workers conventions. - MCP — the agent can talk to your Cloudflare account, not only to files on disk.
- Wrangler — still the CLI for local
wrangler deployandwrangler whoamiif you want that. Day to day I still publish from the sidebar.
Prompts that became useful once this was installed:
- “Why did the last Workers Build fail on revthat, and fix it.”
- “List the Workers on this account and which custom domains they use.”
- “Is this
wrangler.jsoncstill the current way to serve a staticdist/folder?”
That is the difference from WordPress. The old loop was: break something, log into wp-admin, hunt a plugin setting. The new loop is: describe the problem in Cursor. If it is code, Cursor edits the repo. If it is Cloudflare, Cursor uses these tools. You still review before anything destructive.
The part that makes it worth it: prompt, then Commit in the sidebar
Once the first deploy works, publishing is not a CMS, an FTP client, or a dashboard. I do not log into an admin panel. I do not hunt through theme options. I do not type git commands.
I manage the sites inside Cursor. I tell it how I want the sites to be, in prompts: change this headline, put a shared nav on all three domains, move these apps into a labs page, rewrite the about copy, add a post. Cursor edits the source. I look at the result, then I publish from Source Control on the left (the branch icon).
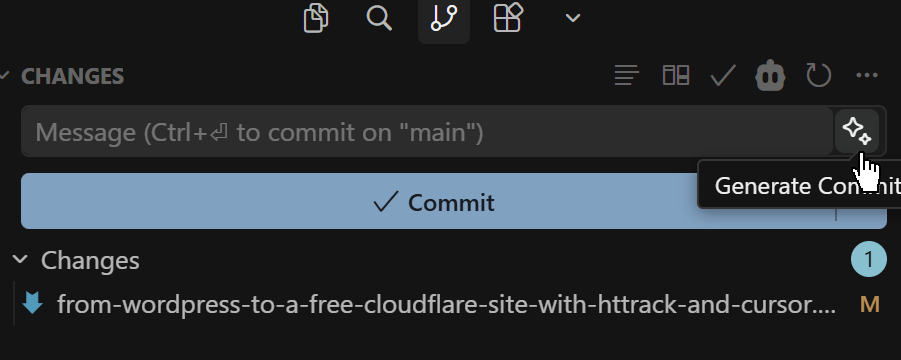
- Open Source Control. Changed files show under Changes.
- Click the sparkle on the message box. Cursor writes a commit description from the diff. Edit it if you want.
- Click Commit.
- Click the next button that appears in that same spot (Sync Changes). That sends
mainto GitHub.
Cloudflare sees the new commit on main, runs npm run build, and deploys the new dist/. A minute or two later the live site is the new one. No plugin to update. No “export to web.” No logging into wp-admin.
That is the whole loop:
- Open the repo in Cursor and describe the change.
- Check it with
npm run devif you want. - Sparkles, Commit, then the next button.
- Cloudflare builds and publishes.
If a build fails, the previous deploy stays up. You can open the Cloudflare dashboard, or you can ask Cursor — with the plugin or MCP servers from Step 4 — to read the Workers Build log and fix the repo. Commit and sync again.
For a blog post on revthat, that can be a Markdown file in src/content/posts/. For a page on truevis, it might be an .astro file. I do not have to know which file before I start. I describe the outcome. Cursor finds the files.
The site source is sitting in the editor the whole time. Cursor can see the components, the CSS tokens, and the other two sister sites if I point it at them. That is a different job than typing into a WordPress block editor with no view of the rest of the stack.
What you give up, and what you get
You give up the WordPress admin. I did not miss it. There is no visual page builder, no plugin directory, no user database, and no comment thread bolted onto every post. If you need a form that writes to a database, you add that as its own thing, not as a plugin. You also give up the Wordfence dashboard and the weekly count of people trying to log in as admin. There is nothing for them to log into.
You get:
- Sites that are files in git, same as the rest of your work
- Hosting that costs nothing on Cloudflare’s free tier for this kind of traffic
- HTTPS and a global CDN without a separate certificate dance
- URLs that match the old WordPress permalinks
- A local copy of everything, plus GitHub as the backup
- An update path that is a prompt in Cursor, then Commit in the sidebar
- Cloudflare tools inside Cursor, so a failed build or a DNS question does not mean another dashboard
I used to publish by fighting a theme. Now I describe the site I want, then I hit Commit.
The HTTrack rip was the bridge: a faithful dump of what WordPress was actually serving. Cursor turned that dump into an npm site. I still use Cursor to run the sites: prompts instead of wp-admin. The Cloudflare plugin and MCP servers are how Cursor talks to the host, not only to the files. Cloudflare serves whatever lands on main. After that, the Source Control sidebar is the CMS.
Agent prompt: convert a WordPress HTTrack rip into a static Astro site
You are an implementation agent. The user has mirrored an old WordPress site with HTTrack (or similar) and wants it rebuilt as a static Astro + Tailwind v4 site. You start with the rip only — no existing codebase unless the user points you at one.
Ask for what you need up front: rip folder path, production domain, and whether the site is mostly pages, mostly blog posts, or a mix. Do not guess paths or invent pages the rip does not contain.
1. Role and goal
Turn a WordPress mirror into a clean static site that:
- Preserves real content URLs (slugs) so bookmarks and search results keep working
- Drops WordPress theme chrome, plugins, and admin junk
- Looks modern and fast: white page, system or Inter font, restrained typography, sticky header, no sidebar clutter
- Ships as plain HTML/CSS with minimal client JS
Match the substance of the old site, not its theme markup. Rewrite fluff; keep factual copy, code samples, and how-tos.
2. Confirm the rip, then inventory
Before writing code, ask the user to confirm the rip path. Typical locations:
C:\My Web Sites\example.comC:\My Web Sites\example\example.com- or a path they provide
List the top-level folders and HTML files you found. Wait if the path or domain is ambiguous.
Extraction method
- Walk the rip. Each slug directory with an
index.htmlis usually one route (/about/→about/index.html). - Preserve slugs. Output routes as
/slug/withtrailingSlash: "always"in Astro so they match the live WordPress URLs. - Pull SEO from each source
<head>:<title>,meta name="description",og:title(Yoast or similar). Wire into a shared layout. Ignore rip canonicals that point atindex.html; emit absolute canonicals fromsite+ path. - Extract body copy from the main content area. Strip headers, footers, cookie banners, “related posts”, comment forms, share widgets, and sidebars from the source — do not rebuild them as-is.
- Copy only referenced images into
public/images/. Do not copy the entirewp-content/uploadstree.
Produce an inventory table before scaffolding:
| Route | Source file | Type (page/post/archive) | Action (keep/drop/link external) |
Get user confirmation when a route is ambiguous (e.g. a tag archive vs. a real landing page).
Skip entirely (junk, not content)
wp-json/,wp-admin/,xmlrpc,feed/,comments/feed/- Query-string URLs:
?p=,?s=, HTTrack duplicates (index7a80.html,embedcc70.html) - Author, date, category, and tag index shells unless the user wants a clean recreated hub
- Pagination folders (
page/2/) — fold into one list page or drop - Plugin assets: jQuery, slider scripts, DataTables, Contact Form 7, Elementor/Astra/theme CSS
- Login, cart, WooCommerce,
nonceURLs
Do not import WordPress plugins. Replace forms with mailto:, a static contact block, or a simple embed the user approves. Replace sliders with a static grid or lightbox.
3. Stack
Scaffold a new Astro project (or use the user’s repo if they provide one):
| Piece | Target |
|---|---|
| Astro | ^5.x |
| Tailwind | v4 + @tailwindcss/vite — tokens in CSS @theme, no legacy tailwind.config.js unless required |
| Font | @fontsource/inter or match the brand if obvious from the rip |
| Output | output: "static" |
| Trailing slash | trailingSlash: "always" |
| TypeScript | astro/tsconfigs/strict |
// astro.config.mjs
import { defineConfig } from "astro/config";
import tailwindcss from "@tailwindcss/vite";

export default defineConfig({
  site: "https://example.com", // ask the user
  output: "static",
  trailingSlash: "always",
  vite: { plugins: [tailwindcss()] },
});
Scripts: dev, build, preview.
Client JS: small islands only — mobile nav, dropdowns, optional lightbox, optional scroll reveal. Prefer .astro + inline <script>. No React/Vue unless the user insists.
Content shape (pick based on inventory)
Mostly static pages (~5–20 routes): one src/pages/*.astro file per route.
Many blog posts: Astro content collections (src/content/posts/*.md or .mdx) + src/pages/[...slug].astro (or /blog/[...slug].astro only if the live site used a /blog/ prefix — follow the rip).
Structured data: galleries, tables, or nav in src/data/*.json or .ts instead of pasting raw WordPress table HTML.
4. Project layout
src/
  layouts/BaseLayout.astro    # head meta, header, footer, main slot
  styles/global.css           # @theme tokens, prose, utilities
  data/site.ts                # name, url, nav, contact
  components/
    Header.astro
    Footer.astro
    PageHeader.astro          # inner-page title + kicker
    Hero.astro                # home hero (optional)
    ContactBlock.astro        # if contact page exists
    YouTubeEmbed.astro        # if embeds exist
    Lightbox.astro            # if galleries exist
  content/posts/              # if blog (optional)
  pages/
    index.astro
    about.astro               # as needed from inventory
    contact.astro
    [...slug].astro           # if blog
    404.astro
public/
  images/                     # copied from rip, organized by section
  robots.txt
Build shared layout and components first, then fill pages from the inventory.
5. Visual system (sensible default)
Unless the user specifies a brand guide, use a minimal consulting/blog aesthetic:
Tokens (CSS @theme):
- Ink
#111111, muted#737373, soft#a3a3a3 - Frame
#f4f4f4for cards/image wells, line#e8e8e8for borders - Inter or the closest match to the old site
Layout
- Max content width ~
max-w-6xl, prose ~max-w-3xl - Prose aligned with page titles (same left edge — avoid a narrow centered column under a wide header)
- Sticky header with light blur; footer with contact + copyright
Typography
- Headings:
font-bold tracking-tight - Body: slightly muted, ~1.05rem, comfortable line-height
- Section labels: small caps, wide tracking, optional square bullet
Components
- Primary CTA: pill button (dark fill, rounded-full)
- Cards:
rounded-2xl, light gray background, subtle image hover scale - Motion: optional fade-in on scroll; respect
prefers-reduced-motion
Hard no
- WordPress/Astra/Elementor/jQuery CSS left in place
- “We migrated from WordPress” copy
- Neon gradients, glass overload, duplicate CTAs on every section
- Rebuilding comment systems unless explicitly requested
Prose CSS tip: scope link styles as .prose a:not(.pill) so button-styled links keep their colors. Restore list bullets/numbers inside prose (Tailwind preflight removes them).
6. Nav and chrome
Derive nav from the rip’s real information architecture, not every WordPress auto-archive:
- Logo / wordmark → home
- Primary links (typically 3–6): About, Services, Blog, Contact — whatever actually existed
- Optional Extras dropdown for secondary or external links (click to open, close on Escape and outside click; external links marked ↗)
- One primary CTA if the old site had one (e.g. Contact)
Mobile: hamburger, stacked links, same destinations.
Put site-wide facts (email, phone, social URLs) in src/data/site.ts, not hardcoded in every page.
7. Copy and links
- Remove theme boilerplate (“Welcome to our site!”, “Stay tuned”, empty sidebars)
- Keep technical content, lists, code, and filenames; fix broken markup only
- Descriptive link text (“read the installation guide”), not “click here”
- Rewrite internal links from rip paths (
../foo/index.html, absolute old domain) to/foo/ - Upgrade
http://tohttps://for external URLs when valid - Dates on posts are enough; drop “Posted in Uncategorized” unless recreating categories on purpose
8. Keep vs drop (default rules)
| Keep | Drop |
|---|---|
| Home, About, Contact, and other named pages | wp-admin, feeds, search result shells |
| Posts the user wants on this site | Duplicate HTTrack clones |
| Images and embeds actually used | Full uploads dump and unused thumbnail sizes |
| Downloads linked from content | Plugin JS/CSS bundles |
| Clean list pages the user explicitly wants | Comment threads (optional “email us” line instead) |
When the user says some content moved elsewhere (e.g. blog on another domain), link out — do not duplicate posts unless they ask.
9. Implementation order
- Confirm rip path, domain, and site type (pages vs blog).
- Inventory routes; table keep/drop; user sign-off on edge cases.
- Scaffold Astro + Tailwind; set
siteURL. BaseLayout,global.css,site.ts, Header, Footer.- Static pages from inventory (home first, then About/Contact, then the rest).
- Blog: extract posts to content collection if applicable; preserve slugs and dates.
- Copy images; fix internal links; add
404.astro. robots.txt; add@astrojs/sitemapif appropriate.npm run buildmust pass.- Browser verification (§10); fix and re-check.
Extract tables and repeated structures into JSON when that is cleaner than pasted HTML.
10. Verification (required)
Do not finish from code review alone. Run astro dev, open the site in a browser, and click through like a visitor.
- Desktop (~1280px) and mobile (~390px)
- Every kept route loads with correct title, description, and trailing slash
- Header, mobile menu, dropdowns, and CTAs work
- Prose: lists show bullets/numbers; images load; embeds play
- Contact links work
- A nonsense URL returns a styled 404 with a way home
- No WordPress assets loading in Network tab
- No broken internal links on a sample of pages
Fix what you find and re-run the same checks before declaring done.
11. Constraints
- Ask/confirm the rip path and domain — do not invent routes or copy
- Preserve slugs for kept content; document dropped routes
- Static output only unless the user requests a server adapter
- No WordPress runtime, PHP, or plugin dependencies in the deliverable
- Minimal scope: match the old site’s content and a clean default design, not a full redesign unless asked